January 2, 2010

Tales in Painting, Chapter 2

In the spirit of the new year I thought I'd post the second installment of Tales in Painting bringing forth renewal and resolution, all thanks to a couple cans of semi gloss white paint.  These twin side chairs were far from beautiful when they posed for their "before" photographs in the bright San Diego sun.  The dull fruity wood frame subtracted from their sunny yellow original upholstery, leaving you with a blah set of chairs destined for either a thrift store corner or a fraternity lawn.  Although I was a bit discouraged with my initial perception, their redeeming qualities consisted of the amazing condition of the upholstery and the retro frame design (minus that ugly frutiness).


The next step toward renewal was to sand down the frames in order for the new paint coat to set:


Two paint coats later, Julien and I were very proud of the final products!  Sadly we are no longer the proud parents of such fabulously recovered patients.  However, they were placed in a loving home, with a nice adoption fee I might add!


What a difference white paint can make!  Look at how the upholstery comes to life next to the bright white frame, securing these chairs a place far far away from the once inevitable fraternity lawn, phew!

November 8, 2009

C-Tables

Join me in welcoming Bryan, our newest FT contributor!  I'm loving his clever commentary and the fact that he saw what he wanted and made it happen, literally. ~Jonna

C-tables are easy to fall in love with. After house sitting for a friend who owned a couple of these Crate and Barrel C-tables, my girlfriend and I really wanted them.


The combination of functionality and style of this piece is tough to beat. The obvious advantage of a C-table is that its base can be slid under a couch or chair so that the table top hangs right over your lap. No more hunching over your old coffee table like a neanderthal. You can sit upright like a well mannered gent, or lean back like a gangsta. Either your crumpets or drug money will be hovering right over your lap within easy reach. This table is very light and can slide easily over carpet or wood. What surprised me is how sturdy it is. Don't be fooled by the delicate look, you can really put some weight on it.

Now on to the important part.... Looks. The tubular steel frame and sharp edges are modern and architectural. The footprint and profile are very light and easy on the eyes. Not bold enough to be a focal point but a great piece to compliment a room without adding bulk. (That was a sad attempt at a Tim Gunn style fashion critique. Thanks for bearing with me.)

So, I decided to get two of these tables as a gift for my girlfriend's birthday. But here is the rub. The sexiest tables are sold at Crate and Barrel for....drum roll please..... $299 a pop! Say WHAT? That's right, assuming you want two tables you are looking at about 6 hundo plus tax. That's a lot of money. But the tables looked simple enough to make. Why not give it a shot?

Since I am not the craftiest person I asked my Dad to help me make the tables. He was a big help and had all the tools we needed (including a welder, skill saw and grinder) and a plan.

The dimensions were randomly selected to be roughly 20" long x 10" wide x 24" tall. Only by chance did these dimensions correspond exactly to the Crate and Barrel C-table dimensions ;) Next we bought 1 inch square tubular steel and cut it to the appropriate lengths using a table saw and beveled the ends as needed. The pieces were clamped to a work bench and wielded together to create the frame. As my Dad was welding, I was using a grinder to smooth out the wields and splatter to ensure no blemishes would show once we were finished.


A 20" x 10" piece of sheet metal was wielded to the top of the frame to form the table surface.


Now for the final touch. Powder Coat. I took them to RW Little in San Diego and they did a great job. I chose flat black and I am happy I did. They turned out great and the total cost was under $100.


This was a really fun project and the end result was very rewarding. The C-tables made a nice gift and my girlfriend absolutely loves them.

October 28, 2009

Tales in Painting, Chapter 1

Once upon a time I used to underestimate the power of paint. Though it abounds in many a color, paint seemed too simple a change for any drastic impact to be achieved. That is, until I laid eyes on this dresser...it became clear to me that this sad piece of teenage experimentation art ("art" might be totally stretching it) needed resuscitating, tout de suite!


What I am ashamed to admit is that this disaster was of my own hand, albeit during my teenage years, even so what was I thinking?!  And to give credit where credit is due, my sister gleefully egged me on with my "bright" ideas and probably even lent a helping hand with the intentionally lacking extra paint coat (if you look closely you might even catch a glimpse of the white brush marks peeking through the kelly green facade, which seemed oh so innovative at the time).  I should've realized my failings upon the movement of this piece into the family garage, where it very efficiently housed various personal and household hygiene products out of sight, out of mind.


However, this dresser's existence was re-affirmed last year when my mother decided that it didn't warrant the space it would consume in the moving truck.  So bye bye mom, hello new-old-ugly dresser.  By this time I was well into my search and restore mode for all things furniture, and now I had a new patient with exciting possibilities...on your marks, get set, paint! 


And without further ado, bid welcome to one of my very first FT patients (post-op of course): 


A clean & simple finish in a Tiffany Blue-ish color playfully mingles with vintage inspired drawer knobs from Anthropologie (one of my faves for furnishings & accessories, not to mention the clothes!), topped off with pictures of my boys. 


*      *      *

*      *      *


This patient had an amazing recovery if I do say so myself!

October 15, 2009

Reconstructive Upholstery

When setting eyes on this sofa for the first time, one might think what's with the army fatigue corduroy? I was that someone, but despite my pre-judgments I squinted my eyes to sort of imagine what this sofa really wanted to look like. And then I was ready to go all the way. My husband and I cheerfully paid the sellers (I LOVE Craigslist!) and we were off to see the wizard.


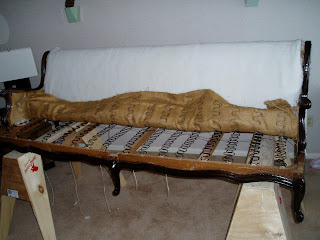
First and foremost, the upholstery had to go! Where this piece would look acceptable I couldn't begin to contemplate, so I stopped right there. Onto new fabric...what this sofa needed was something refined, subtly modern with a smooth pattern (if any at all). Then came the work! I won't lie, Julien did the manual labor and loved every minute of it (at least that's what I told myself), while I put in my hours with the design details.


Bye bye separate seat cushion!


After pretty much gutting the thing, the rejuvenation process started with a mild but potent frame exfoliation (aka wood stripping) followed by staining with an espresso finish, giving the suggestively curvy frame a deep and luxurious lustre. Re-cushioning the sofa back, the seat and arms came next.


Oh my, we can see your under wires!


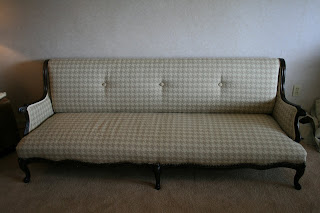
We decided on this great over-sized hounds tooth upholstery in light cream/sable. The contrast with the newly esspresso'd frame was just what I had pictured!


On it's way to perfection...


The edges have been cleaned up, now it's time for some embellishments!


Nail head tacs to clean up the lines...


And of course we wouldn't want to forget tuft buttons!


And just to reflect on the journey this couch has made, here's The Before:


Et voila! The After


C'est fini